- The Centerhold Technique can be used with lensatic or orienteering compasses.
- Then move the lens (rear sight) to the rearmost position to allow the compass dial to float freely.
- Hold the compass at waist level, with your elbows firmly against your sides, with your hands
in the position shown below:
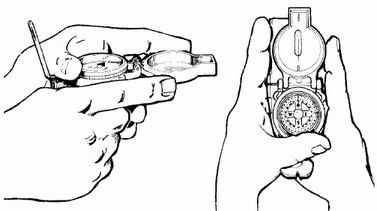
The centerhold technique used with a lensatic compass. You can hold an orienteering (Silva compass) the same way.
- To use a lensatic compass while holding it this way, simply look down and read the number under the black reference line. This is the azimuth of the direction you index fingers are pointing.
- To use an orienteering compass while holding it this way, rotate the compass dial until the "N" is under the needle while pointing at the target with your index fingers. Then read the dial number aligned with the "read bearing here" line. This is the azimuth of the direction you index fingers are pointing.
- The Compass-to-Cheek Technique is typically used with a lensatic compass, though some newer orienteering compasses have sighting lenses and reference lines as well.
- Hold the compass as shown below.
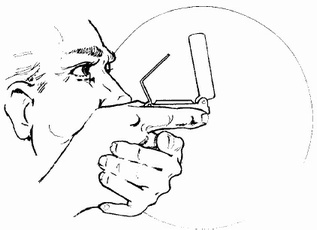
- To use the compass when holding it this way, look through the rear sight notch and align the front sighting wire with your target. Look down through the lens one rear sight and read the number under the black reference line. This is the azimuth of the direction you are sighting.
- This technique can be more accurate, but takes longer. If you are wearing metal glasses, they may affect the compass when held this close to your face.
- With a lensatic compass:
- Use the centerhold technique.
- Rotate your body until the desired azimuth fall under the fixed black index line.
- Turn the bezel ring until the luminous line is aligned with the north-seeking arrow. One you obtain alignment, the compass is preset.
- To follow an azimuth, keep the north seeking arrow aligned with the luminous line. Look along the way your fingers are pointing, and pick out a distinctive terrain feature along the azimuth and walk toward it. Occasionally recheck the compass to ensure the north seeking arrow is still aligned with the luminous line.
- With an orienteering compass:
- Turn the compass dial until the desired azimuth is aligned with the "Read Bearing Here" line.
- Use the centerhold technique.
- Rotate your body until north seeking arrow is aligned with the "N" on the compass dial.
- To follow an azimuth, keep the north seeking arrow aligned with the "N" on the compass dial. Look along the way your fingers are pointing, and pick out a distinctive terrain feature along the azimuth and walk toward it. Occasionally recheck the compass to ensure the north seeking arrow is still aligned with the "N" on the compass dial.
- Use a flashlight to set the appropriate azimuth as listed under daylight compass work (above). Use a red or blue lens to avoid night blindness.
- To follow an azimuth:
- Orienteering Compass: To follow an azimuth, keep the north seeking arrow aligned with the "N" on the compass dial. This only works if the arrow and the "N" are luminous.
- Lensatic Compass: To follow an azimuth, keep the north seeking arrow aligned with the luminous line.
- Occasionally "recharge" the luminous marks by cupping your hand around a white light flashlight and the compass dial, ensuring the compass gets the light without blinding any team members.
- High Tension Power Lines -- 55 meters.
- Vehicles -- 10 meters
- Telephone poles or metal fences -- 10 meters.